How to Photograph 600 Pieces of Art in a Few Days

Every year, artists donate hundreds of pieces of artwork to make the Patrons’ Show Fundraiser possible.
Because not everybody has a lot of time to come see the show before the drawing night, we also put photos of every donation online. This year’s batch is being uploaded here, and by the end of Patrons’ Show this year, the Flickr set with these images will have over 50,000 views from people diligently making their lists.
The Gallery gets a lot of questions about how this process happens, so I (George, Art League blogger/photographer) made a short guide. This is just a rough overview, so feel free to ask questions in the comments and check out this Q&A with Pete Duvall, the photographer who teaches the Photographing Your Artwork workshop each year. (I took it this past September.)
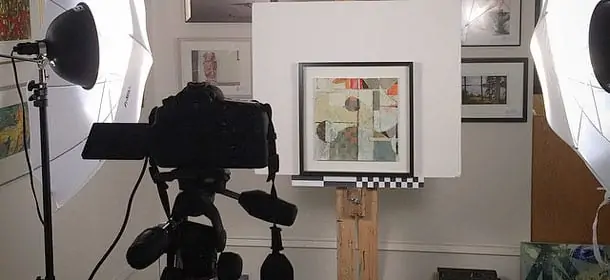
With over 600 pieces to photograph, there’s not much time to spend on individual pieces. That’s why speed and repeatability guide my setup:
- Artwork: A must-have, for obvious reasons. 2-D artwork goes on one of these sturdy, handmade Art League easels to make things quick and easy to trade out. 3-D artwork will go on a pedestal with a plain background like a white wall.
- Scale: As many patrons commented last year, one of the shortcomings of viewing artwork online is it’s difficult to tell how large things are. Rather than measuring all the dimensions for you, this year I’m including this black-and-white scale (in inches) below each image so you can get a rough sense of size.
- Camera (with tripod and USB): I use a Canon with the 50mm f/1.8 lens, which is working perfectly. It’s set to manual exposure so the photos are consistent. With the aperture at f/11 or higher, the depth of field is large enough that there’s no need to refocus for each piece of artwork.
- Laptop (not pictured): All the photographs are triggered from, and stored on, a laptop instead of the camera. I use Lightroom for capturing and editing all the images — see below for more about this software sent from heaven.
- Lights: The most important ingredient after the obvious ones (artwork and camera). I’m using a setup with two lights and umbrella diffusers — specifically, an umbrella kit from Smith-Victor. The umbrella diffusers soften the lights and make them larger, which minimizes shadows. Using two lights at a 45-degree angle almost eliminates glare, even on works under glass. You’ll still get glare on some very textured paintings, but not much. You’ll want the lights equidistant from the artwork to ensure even lighting. For 3-D artwork, you may want to experiment with changing the distance and position of one of the lights to bring out the features of the sculpture.
Apart from the lights, you’ll want the room to be dark. Not an easy place to find in the Torpedo Factory — have you ever noticed the walls don’t reach the ceiling? — but the Bin Gallery has done an admirable job as photo studio.
Set up the easel at one end of your space, and check it with a level. Set up your camera at an appropriate distance and get it squared with the easel. That way, the finished image will be a rectangle and not a trapezoid! (That’s known as keystoning and it can be fixed in Photoshop — try a tutorial like this one.)
With the camera, artwork, and lights all set up, it’s time to take the picture. Adobe Lightroom has been an indispensable part of the process this year.
The goal is to minimize post-processing. You can fix things like glare, perspective, and white balance in Photoshop, but if you can avoid it, you’ll save hours of time on a project like this. In fact, the only processing necessary this year was to crop each image to the corners of the frames and resize. No Photoshop at all.
I use Lightroom’s tethered capture to take the pictures — just press a key on the laptop to release the shutter. This has two benefits: saving the pictures directly to the laptop, and not needing to touch the camera means no shaky pictures.
Then, I add the metadata (artwork title and artist) to the file immediately. There’s no need to go back and do it later. When I export, Lightroom can automatically use this metadata to rename the files to what you see on Flickr.
Once you’ve got it all set up — admittedly, not a short process — the rest is an easy rhythm: place the artwork, tap the laptop to take the picture, save it, and export everything directly to Flickr. Nothing moves except the artwork. With help, I can photograph, save, and upload about 40 pieces an hour.
The last component of the operation? Our amazing volunteers! Lugging over 600 pieces of art back and forth and keeping them organized in the Gallery’s closet is a lot of work, so give them a thank you if you see them!
And now you know how it’s done. The exhibit itself doesn’t go on view until February 4, but you can look at the Flickr set here as we continue to add images over the next few weeks. Let me know if you have any questions!
Can't get enough?
Sign up for our weekly blog newsletter, subscribe to our RSS feed, or like us on Facebook for the latest Art League news. Visit our homepage for more information about our classes, exhibits, and events in Old Town Alexandria, Virginia.
