Much like framing your artwork, photographing it is one of those things that can feel like a chore: necessary for entering exhibits and selling work, but not easy to do. One option is to pay a professional (see the bottom of this post for recommendations). Another is to try it yourself.
If you’ve attempted photographing your artwork in the past, you’ve probably noticed a number of issues: uneven lighting, incorrect colors, and glares and shadows. This method reduces those problems while using nothing you don’t already have (assuming you have access to a camera and a computer).
Step one: Get a cloudy day
Wait until it’s overcast outside. Why? The cloud cover will act as a giant diffuser — like those umbrellas photographers use — so that the light seems to come from everywhere. That means your subject will be evenly lit. Set your piece up in a safe place, not too windy, where the light can get to it from every angle.
Not a cloudy day and you’re on a deadline? Time to rearrange the furniture. Get two lights of the same power and color (that is, the same light bulb) and arrange them like this:
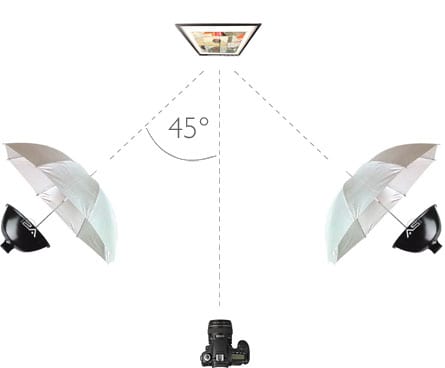
If you can, use a translucent plastic bag as a cheap diffuser: hang it over the light so it’s softer and less direct. Please be careful and don’t do this with hot lights!
By the way: make it easy on yourself and photograph your work before it’s framed. That way, the glass or Plexiglas over top won’t cause reflections.
Tips for 3-D work: The main concern here is to have a background free of distractions — preferably, plain white or black, or a gradient between the two. (Even if you shoot outside, you don’t want the viewer to notice your surroundings.) To show off the texture, it may be beneficial to have the light source stronger on one side than the other, to create some (slight) shadows. The juror for “Taking Shape” offered more tips in her juror’s dialogue.
Step 2: Change your camera settings
Your light is ready to go. Now to get your camera set up the way you want it.
(Note: while your smartphone is great for quick in-progress shots to post to Facebook, it’s not suitable as a camera for submission-quality photos. Use or borrow a digital camera with better resolution and more control over the settings.)
White balance is how the camera determines what color “white” is, which artists know depends on the temperature of the ambient light: incandescent, fluorescent, sunshine, etc. This is where you might have run into problems with inaccurate colors in your past photo attempts.
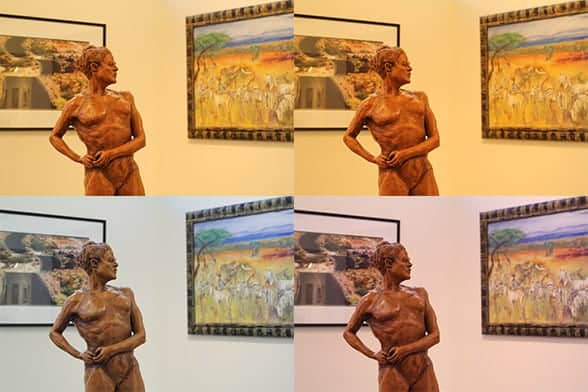
Find your white balance setting and set it to “cloudy,” which might also be represented by a cloud icon. If you can’t find it, and your camera manual doesn’t mention white balance, try shooting your art against a white background (like foamcore), and hopefully your camera’s auto setting will correctly adjust. But if you do have control over white balance, avoid using auto-mode while shooting artwork.
If you’ve gone the indoor route instead of a cloudy day, set the white balance to match the kind of light you are using. Correctly setting the white balance will get your colors pretty close to spot-on, but if not, you can adjust the temperature and tint in the free photo editor of your choice.
Finally, make sure your flash is turned off.
Step 3: Take your shot
Do you have a tripod? This is the time to use it. Otherwise, stand or sit still, hold your elbows against your body, and take and release a deep breath before taking the picture. You can also try propping the camera on something solid. Take several pictures in case some are out of focus or blurry.
Position the camera so it’s facing the artwork head-on: the lens should line up with the center of the subject, and not tilted one way or another. In other words, the plane of the artwork should be parallel to the back of your camera — or you’ll get a trapezoid instead of a rectangle.
Finally, get a little closer. The artwork should fill the image, horizontally or vertically, to maximize the resolution of the final photo. Don’t waste those pixels!
Step 4: Edit
If you don’t have a photo editor on your computer, you can always download one for free (see below for links). And if you saved the box your camera came in, there may be a disc in there with photo-editing software.
First, correct the color if necessary. You might find this option under “color correction,” “color balance,” “temperature,” or “tint.” The goal here is to get your whites white and your blacks black. You may also want to manually adjust the contrast. Using “auto” color or contrast is probably not going to work for photos of artwork.
Second, crop the image so your artwork fills the image (2-D artwork) or it has some room to breathe, without anything distracting in the background (3-D artwork).
Finally, resize if necessary. The Art League has a minimum image size for online jurying (1920 pixels for the longest side), but no maximum size, so you should be all set. Save it with a new file name so you don’t lose the original file. Now you’re ready to submit!
Other resources
Blog posts & tutorials
- How to Photograph Your Art: Saatchi Online video
- A very thorough guide by J.R. Compton
- EmptyEasel.com’s guide
- Photographing Your Artwork: Pete Duvall’s workshop at The Art League in March 2016
Photographers for hire
- Photo shoots for Art League members (Summer 2015)
- Anything Photographic (Pete and Alison Duvall)
- Greg Staley Photography
Free image editing software
- Preview (included with any Mac)
- Paint.NET (Windows)
- GIMP (Windows/Mac)
- PhotoScape X (Mac)